
Wednesday, 25 December 2019
Friday, 6 December 2019
T Class Submarine
Here we have a British T Class submarine which I can now add to my WWII coastal warfare game. The T Class subs were designed in the '30s and became the Royal Navy's standard ocean patrol submarine. They served in the North Sea and the Mediterranean and later in the far East.


Monday, 2 December 2019
Caboose Complete
Courtesy of Wiki:
So I had to look up the meaning of the word Caboose as I have now completed mine for the Hog Thief Bend Railroad Company. Once again, a 4Ground MDF kit.


Railroad historian David L. Joslyn (a retired Southern Pacific Railroad draftsman) has traced the possible root of "caboose" to the obsolete Low German word Kabhuse, a small cabin erected on a sailing ship's main deck. This was absorbed into Middle Dutch and entered the Dutch language circa 1747 as kabhuis, the compartment on a ship's main deck in which meals were prepared.
Eighteenth century French naval records also make reference to a cambose or camboose, which described both the food preparation cabin on a ship's main deck and its stove. Camboose may have entered English through American sailors who had come into contact with their French allies during the American Revolution. It was already in use in U.S. naval terminology by the 1797 construction of the USS Constitution, whose wood-burning food preparation stove is known as the camboose. In modern French, cambuse can refer both to a ship's storeroom and to the North-American railcar.
Camboose as a cook shack was in use in English at least by 1805, when it was used in a New York Chronicle article cited in the New English Dictionary describing a New England shipwreck, which reported that "[Survivor] William Duncan drifted aboard the canboose [sic]." As the first railroad cabooses were wooden shanties erected on flat cars as early as the 1830s, they would have resembled the cook shack on a ship's deck.
The earliest known printed record of "caboose" used to describe the railcar appeared in 1859 in court records in conjunction with a lawsuit filed against the New York and Harlem Railway.
So I had to look up the meaning of the word Caboose as I have now completed mine for the Hog Thief Bend Railroad Company. Once again, a 4Ground MDF kit.


Saturday, 30 November 2019
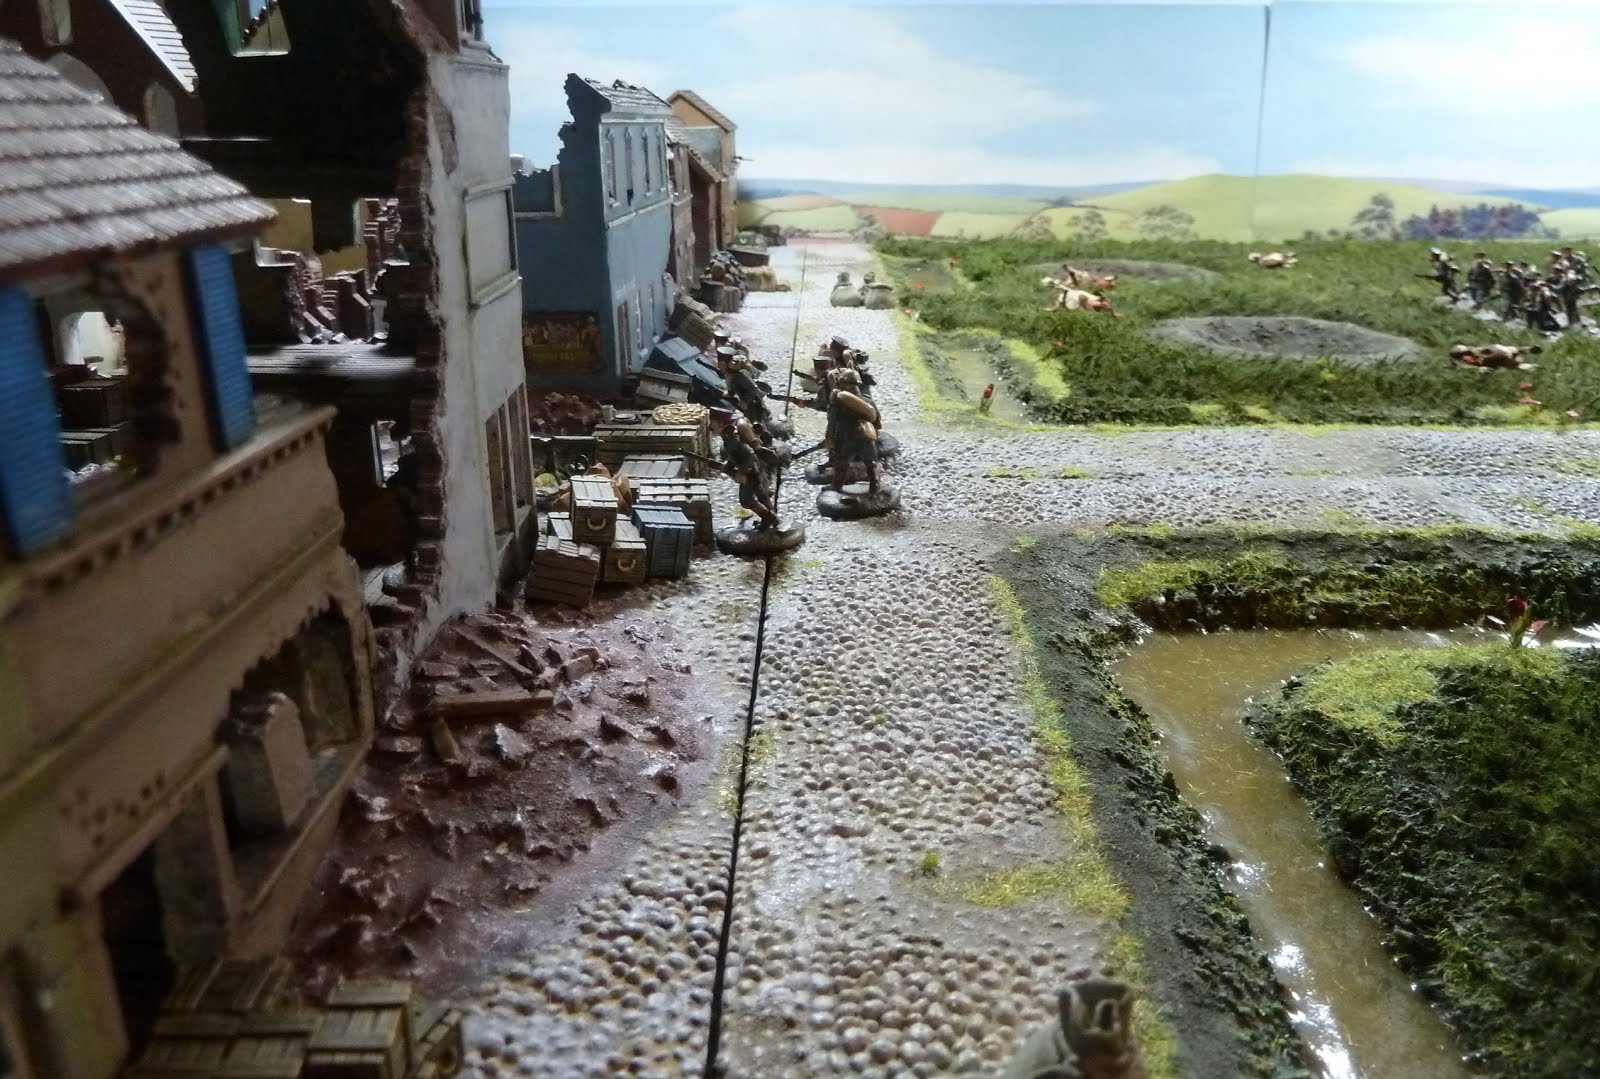
A Conclusion at Le Cateau
The
decimated section of 1 Zug reaches the barricade at the crossroads. These would
have been a 19 man section at the beginning of the attack and it looks like
about 8 have made it to the town. They had the hardest job as they were
advancing directly in the line of fire of the Vickers team. By this time
however, the Vickers was only being manned by two of the team and thus the rate
of fire had been halved.
It was time
for the cold steel. The British had the advantage of fighting from behind cover
but the Germans in most places were able to put 2 men onto 1, which made it
difficult for the British to survive as they had to win two fights. I am very
sad to report that it was here that Colour Sergeant Neddy Snapcase and Lance
Corporal Spankhurst went to glory, refusing to give an inch of ground as a ‘Die
Hard’ should.

No. 1
Section of the ‘Die Hards’ was under the command of Corporal Bunter and had
spent three turns in a row not firing at the advancing German column led by Oberleutnant
von Vagabund.

The other
section of 1 Zug on the German left flank had arrived at Le Cateau relatively
unscathed. Flashheart had been hustled to the rear at point of bayonet and
Oberleutnant von Emvier can be seen here brandishing the family sword and
ordering his men into the attack.

Helmut von Vagabund’s
double column now split into two sections, one attacking the centre and the
other heading to the Boucherie on the German right flank to see why no fire was
coming from there!


My dice
throwing suddenly took a turn for the better and the British were able to do
very well at the hand-to-hand fighting but the odds were just too great. If a ‘Die
Hard’ won a fight, then two more Germans would move into position immediately.

One by one,
the valiant defenders were picked off by the advancing Magdeburg infantry.


Now the
jubilant survivors of 1 Zug were into the town. Here we see the remaining five
survivors, three more having gone down in the bitter bayonet fighting at the
barricades.

The German
soldiers now concentrate on mopping up the last remaining resistance from the
Middlesex rearguard.


Just when
they thought it was all over, a Belgian Minerva armoured car, commanded by 1.eme
Lieutenant Charles Henkart appears from the town. Once again, a special event
at the commencement of turn 5 and its location determined at random by a D6.


The Belgians
open up with Hotchkiss MG but it looks to their eyes as if it is too little,
too late. As the Minerva begins to engage the German soldiers, they can see
that the rearguard have died to a man, buying vital time for their comrades to
retire from the town and take up their positions ready for the day’s epic events
to unfold.

The Minerva
bursts through the barricades and turns north on the disputed road, firing the Hotchkiss
as they drive.

1.eme Lieutenant
Henkart decides that discretion is the better part of valour and decides to
make a hasty exit from the town. A section of von Vagabund’s men is blocking
the road but with great Belgian verve, Chaffeur Hergé drives straight through
them, running two of them down as they leave the town of Le Cateau.


There,
unfortunately for the British, the game came to an end. The British needed to
defend the town until turn 7 but by turn 5, most of the rearguard were dead and
the Minerva was unable to turn back the triumphant advance of the 26th Magdeburg. The scoring looked like this at the end.

All 32 of
the Middlesex Regiment were killed. The 26th Magdeburg took 26 casualties.
Lord Flashheart became a PoW but I’m sure he will escape shortly!
So, all in
all I thoroughly enjoyed this game. Silent Invader’s scenery, rules, figures, Sopwith
and Minerva really made it a visually delightful game. My friends, Doug and
John made the game a pleasure to play. A fantastic weekend hosted by John and I
am looking forward to seeing their game reports. I have absolutely no shame in
reposting the photo of the Three Musketeers at the end of my game. Thanks, gentlemen!

The End
Wednesday, 27 November 2019
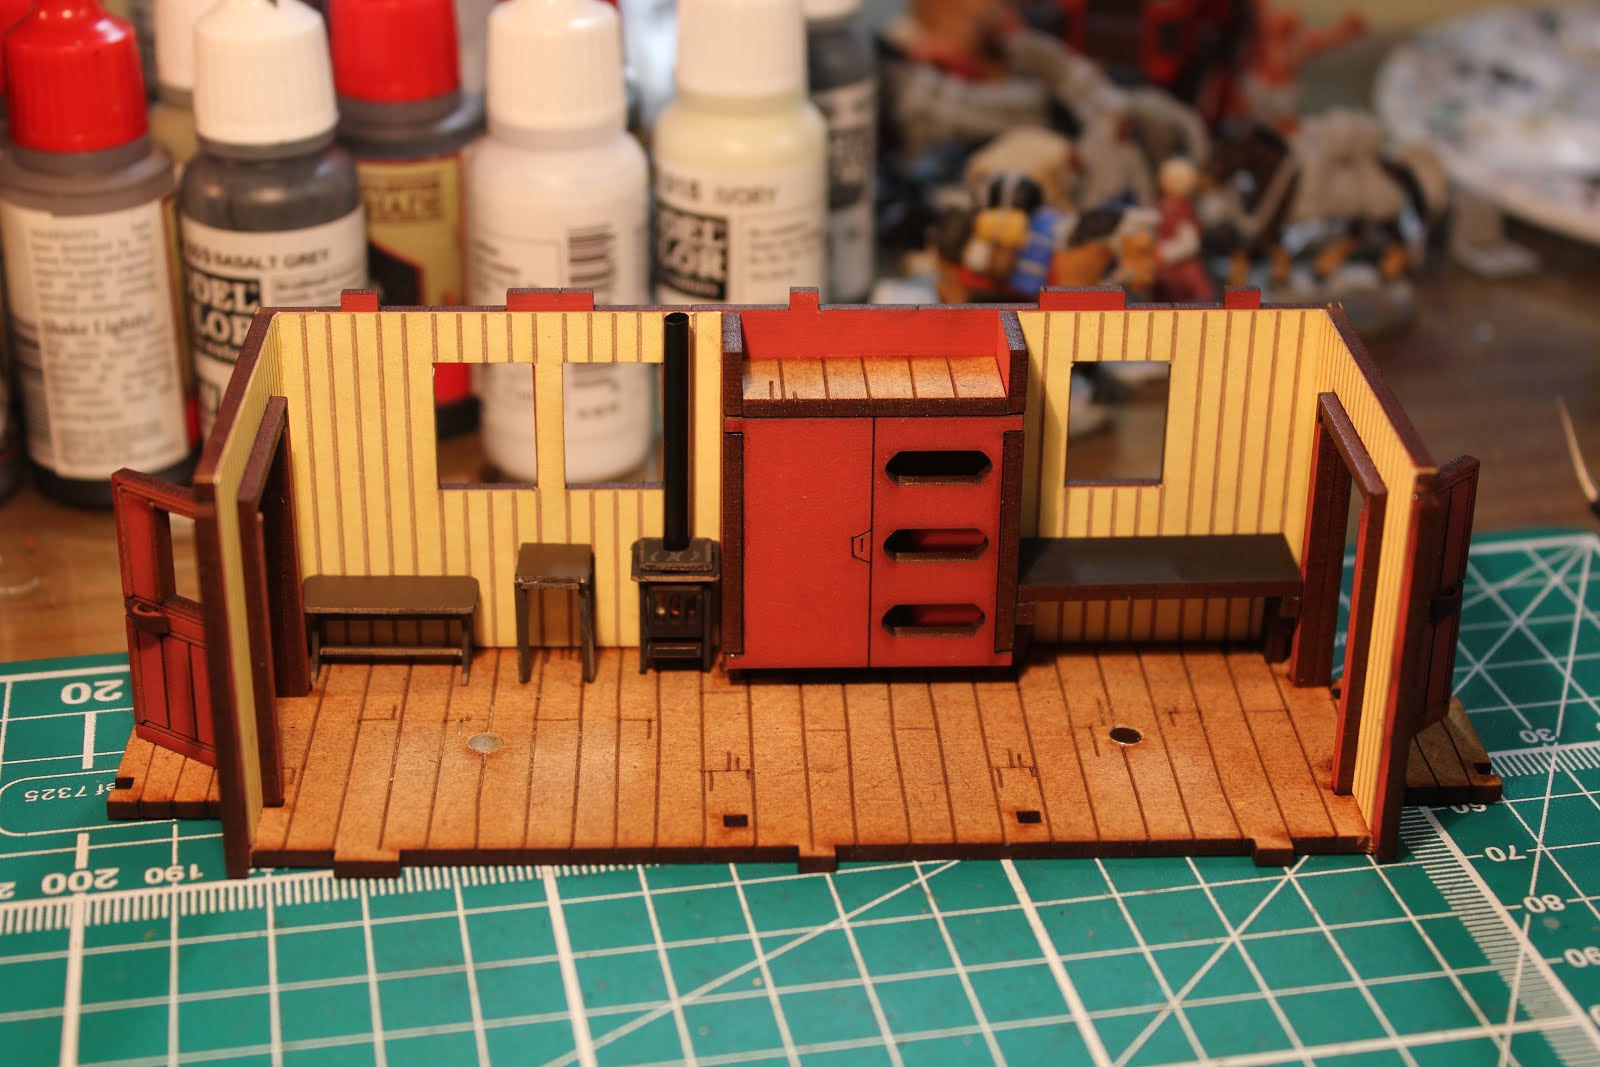
Caboose
I'm building the caboose nest and I'm very impressed with the level of detail included on the inside. I took this picture now as I'm about to glue the remaining side on.

Tuesday, 26 November 2019
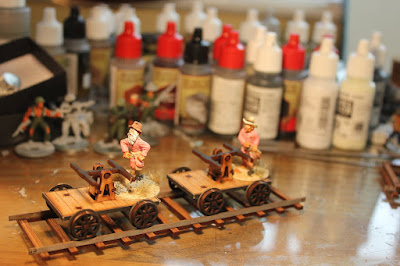
Hand Carts
I have added a couple of hand carts to the 3:10 from Hog Thief Bend. These will provide the necessary comedic aspect of the game. (Go on, Ivor, you know you want to buy some!).


I thought I would include a view along Main Street in Hog Thief Bend. When the train is complete, I have a station to build and then it may be time to set up for game. Here are the happy citizens going about their daily business unaware that the Iron Horse is about to descend on their sleepy town.

Monday, 25 November 2019
Flat Car
I have now added a flat car to the 3:10 From Hog Thief Bend.
Should be good for a bit of gunplay with some crates etc. stacked up on it.

Should be good for a bit of gunplay with some crates etc. stacked up on it.

Flashy Prangs His Kite!
There were
some special events planned and the arrival of the Maxim teams in Turn 2 was
featured in the last post. At the start of turn 3 there was another event
planned.
At GHQ there
were great concerns over the location of I Corps under the command of Sir
Douglas Haig. Staff officers at GHQ were assuming that Haig would support
Smith-Dorrien and his II Corps in the coming stand at Le Cateau. Instead, the
only sketchy information which GHQ had received, indicated that Haig was
drawing further away from II Corps instead of coming to assist.
Major Robert
Brooke-Popham, commander of No. 3 Squadron, Royal Flying Corps was tasked with
finding Haig’s location.
No. 3
Squadron were equipped with single-seater Sopwith Tabloids which were being
used as scout planes. Major Brooke-Popham immediately sought out his most
daring pilot, the Lord Flashheart and tasked him with locating the missing I
Corps.

Sopwith Tabloid

The Lord
Flashheart
Flashheart’s
mechanic, one James McCudden had the Tabloid ready and Flashy took to the
skies. His search began in the skies over Le Cateau and Flashy intended to
widen his circle of search until he located the missing Corps. Unfortunately,
it was not to be. A stray rifle bullet (probably fired by the 26th Magdeburg
down below) ruptured the fuel line of the Tabloid which rapidly began to run
out of ‘juice’.
The game
required the plane to crash in the centre of a tile determined on a roll of a
D6. I was fervently hoping that it would crash directly onto some German
infantry. However, my dice rolling being what it was, Flashy came down fairly
well and pranged his kite in the fields outside Le Cateau.

The Lord
Flashheart scrambled out of the Tabloid cockpit and saw how close the
approaching German column was. He readied his revolver and prepared to sell
himself dearly.


The German
commanders would score more victory points at game end by taking the pilot prisoner
rather than killing him and this is what they did.

Lord
Flashheart was surrounded by German soldiers and was forced to surrender.


Flashy was
escorted to the rear to take no further part in the battle.

As this was taking place, the decimated section which had advanced up the cobbled road was reaching the British barricades. The next post will feature the vicious hand-to-hand fighting over the barricades and will show how the valiant ‘Die Hards’ fought a rearguard action worthy of their regiment’s name.
(It is true that a scout plane was sent by GHQ to look for Haig on the morning of the battle of Le Cateau. James McCudden was a mechanic and later observer in No. 3 Squadron until he trained as a pilot in 1916. He went on to achieve 57 aerial victories).
To be continued…
Sunday, 24 November 2019
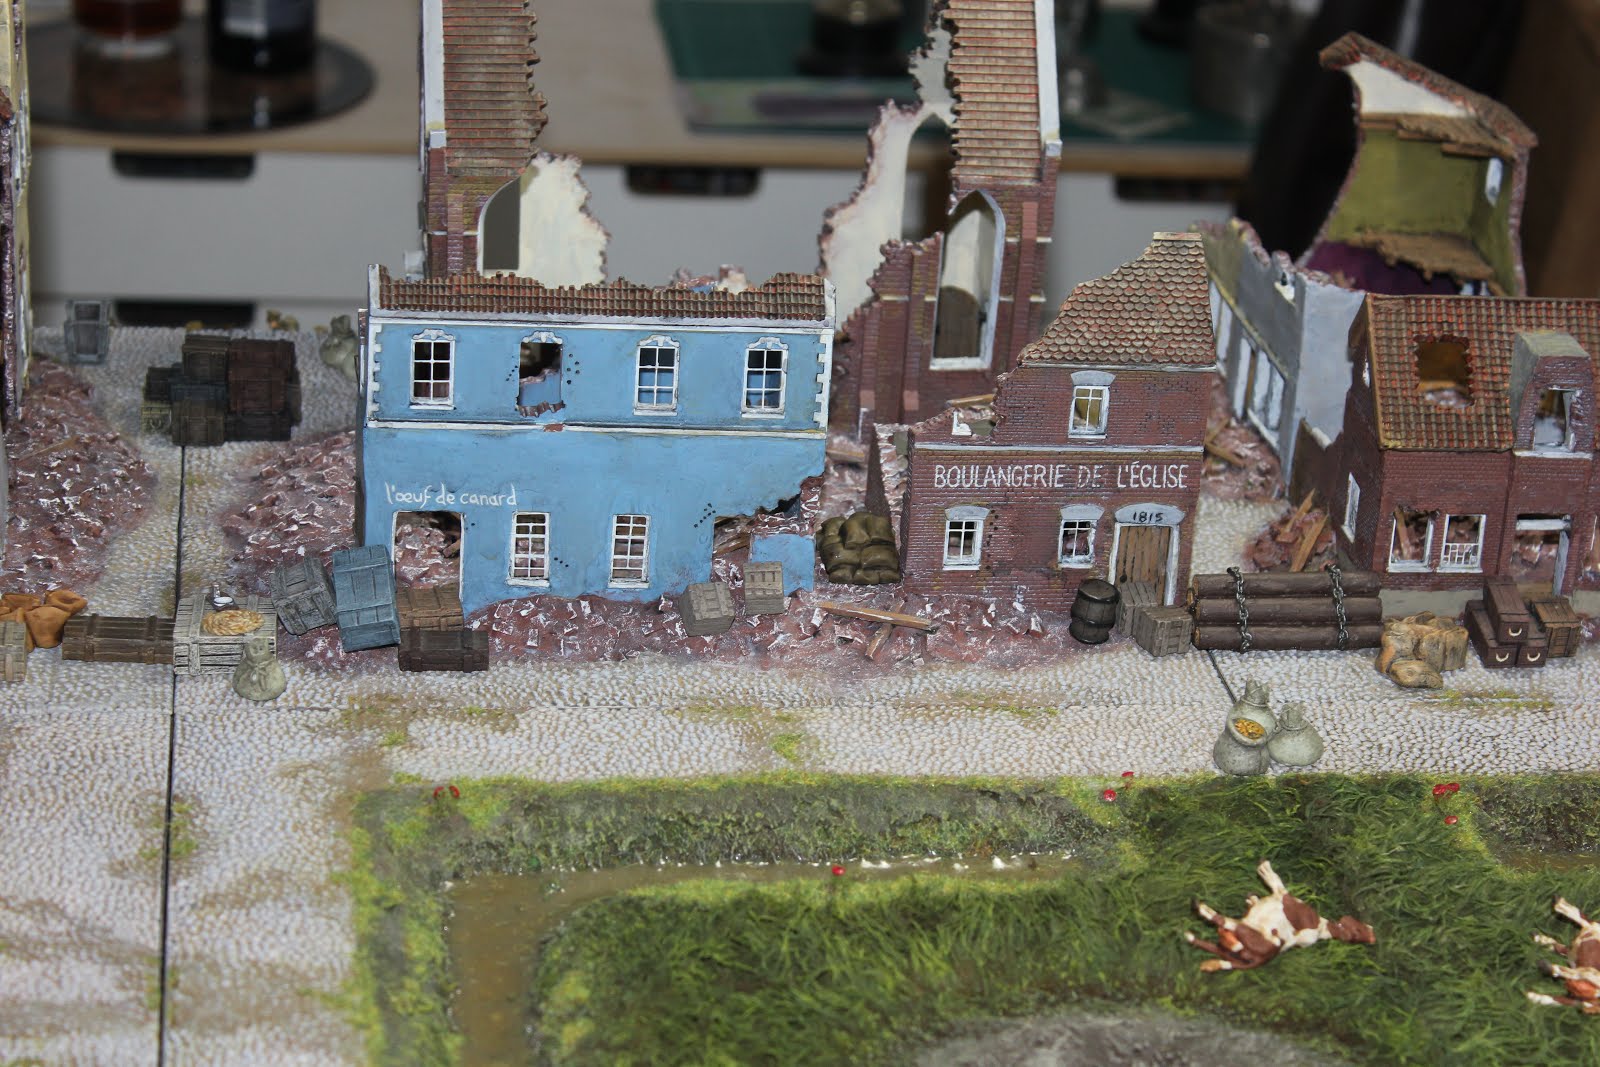
Le Cateau - The German Advance
After
dispositions were mapped the German commanders needed to decide how they would
conduct their advance. They could advance in column which would mean they would
advance much faster or they could spread out in open order. Open order would
result in less casualties but would mean a slower advance to target. Oberleutnants
von Emvier and von Vagabund were given time to decide this over some bottles of
beer I had bought at the Black Sheep brewery at Masham whilst on holiday. This
was an important conference as in the game they would only be able to talk to
each other if their character figures were within 6” of each other on the
board.

Meanwhile, I
as the British was allowed to put barricades up across the roads and building
fronts.


Having built
the barricades, I managed to drag the Germans away from their cosy fireside
chat and figures were placed on the board. The German players were not allowed
to view the British dispositions from anywhere except their end of the board.
They were unsure as to the number of machine guns the British had. Oberleutnant
von Vagabund produced some 1:1 scale binoculars to view the British positions.


The British
machine gun position commanding the vital cross roads. There was only one
Vickers to hand for Colour Sergeant Snapcase’s boys but the Germans weren’t to
know that.

On the
right, Colour Sergeant Snapcase, second from right is Lance Corporal
Spankhurst. Corporal Alf Tucker commands the 4-man Vickers team.
Now was the
time for the German commanders to put their cunning plan into action. They had
elected to advance ‘en colonne’ in the Napoleonic fashion. The early
days of the Great War more often resembled the wars that had gone before,
rather than the war that was to come. Cavalry roamed the battlefields and guns
were bought into action by teams of horses and limbers. The overall British
commander of II Corps, Smith-Dorrien had survived the slaughter at Isandlwana
and fought bravely as a junior officer in the Second Boer War.

The two
sections under von Emvier advanced, one in the fields to the south and the
other directly up the cobbled road leading to the disputed crossroads.


The two
sections under von Vagabund form a column together and take a more northerly
route through the open fields.


The section
advancing up the cobbled road start to take casualties from the Vickers.
British casualties are light at this point as only the front two ranks of each
column can fire. With an understrength platoon though, the Die-Hards cannot
afford to take any casualties in their desperate defence.

Out of focus
(as he often is) von Emvier can be seen here leading from the rear. He assured us
that this is the correct military tactic and who were we to argue?

The German
advance continues relentlessly and the more northerly column is surprised to
find very limited fire coming from the Boucherie. This is due to that British
section being out of contact with their Sergeant and throwing some very poor
dice to activate with a corporal in charge.


At the start
of Turn 2 the Maxim gun teams arrive on the eastern edge of the board on random
tiles. They begin to advance to catch up with the fast-moving columns.


Although the
Vickers continues to fire directly into the advancing German infantry, the rate
of fire is halved as two of the Vickers crew are killed.


The Germans
are now very close to the British barricades and it looks like they may have to
storm these barriers with the bayonet. More portentous events will unfold in
the next post as the 26th Magdeburg charge with cold steel.
To be continued…
Subscribe to:
Posts (Atom)